
Are you ready to learn how to build an ASP.NET Core 8 Web API step-by-step? In this step-by-step tutorial, we’ll create a fully functional Web API that can manage data efficiently and interact with other applications. You’ll connect it to a SQL Server database using Entity Framework Core, and we’ll test the API endpoints using Swagger and Postman — all within Visual Studio 2022.
This guide is designed to be hands-on and practical, so you can follow along and use the code directly in your own Visual Studio project. By the end of this tutorial, you’ll have a working Web API capable of performing all CRUD operations — Create, Read, Update, and Delete — on your data.
Building your own Web API is not just a coding exercise; it’s a crucial skill for backend development. Whether you plan to create web applications, mobile apps, or integrate AI-powered features, having a solid understanding of Web APIs and database integration gives you a strong foundation for professional projects.
What is ASP.NET Core Web API?
An ASP.NET Core Web API is a type of application that allows different clients (like web apps, mobile apps, or other services) to communicate with your backend server. It uses HTTP requests to send and receive data, often in JSON format.
If you’re new to this concept, I recommend reading my detailed guide:
What Is Web API in .NET? Explained Simply (ASP.NET Core Web API) where I explain Web APIs in beginner-friendly language with examples.
Prerequisites
Before we start, make sure the following are installed on your machine:
- Visual Studio 2022 (Download Official)
- .NET 8 SDK (Official Microsoft Docs)
If you’re confused about different .NET versions, check my detailed comparison: Difference between .NET Framework, .NET Core & .NET 8. - SQL Server (Express or Developer edition) (Official Microsoft Docs)
- Basic knowledge of C# and databases
Basic knowledge of C# and databases
How to Build an ASP.NET Core 8 Web API Step-by-Step
Step 1: Create a New ASP.NET Core Web API Project
1. Open Visual Studio 2022.
2. Click Create a new project.
3. Search for ASP.NET Core Web API in the search box
4. Now you will see different ASP.NET Core Web API templates, select
ASP.NET Core Web API – A project template for creating a Restful web API using asp.net core controllers.
5. Click Next.
6. Enter the project name, for example: SmartInventoryApi
7. Choose the project location and click Next.
8. Select .NET 8 as the framework.
9. Make sure Enable OpenAPI Support (Swagger) is checked.
10. Click Create.
Now your project is created with a default structure and a sample WeatherForecast controller.
Step 2: Add the Item Model Class and Database Context
We will create Item model class and database context class to store inventory data.
Create the Item Model
1. In your project, create a folder named Models.
2. Add a new class name : Item.cs:
using System.ComponentModel.DataAnnotations;
namespace SmartInventoryApi.Models
{
    public class Item
    {
        public int Id { get; set; }
        [Required]
        public string Name { get; set; }
        public int Quantity { get; set; }
        public decimal Price { get; set; }
    }
}Create the ApplicationDbContext
1. Create a folder Name: Data.
2. Add a class name: ApplicationDbContext.cs:
using Microsoft.EntityFrameworkCore;
using SmartInventoryApi.Models;

namespace SmartInventoryApi.Data
{
    public class ApplicationDbContext : DbContext
    {
        public ApplicationDbContext(DbContextOptions<ApplicationDbContext> options)
            : base(options)
        {
        }

        public DbSet<Item> Items { get; set; }
    }
}Step 3: Install Entity Framework Core Packages
Open Package Manager Console and run:
Install-Package Microsoft.EntityFrameworkCore.SqlServer -Version 8.0.8
Install-Package Microsoft.EntityFrameworkCore.Tools -Version 8.0.8
Install-Package Microsoft.EntityFrameworkCore.Design -Version 8.0.8Step 4: Configure the Database
Add Connection String in your appsettings.json file.
"ConnectionStrings": {
  "DefaultConnection": "Server=localhost;Database=SmartInventoryDb;Trusted_Connection=True;MultipleActiveResultSets=true"
}Register DbContext
Open the Program.cs file (located in the root of your project) and add the following using statements at the top:
using Microsoft.EntityFrameworkCore;
using SmartInventoryApi.Data;Then register the DbContext inside the builder services:
builder.Services.AddDbContext<ApplicationDbContext>(options =>
options.UseSqlServer(builder.Configuration.GetConnectionString("DefaultConnection")));Make sure your Program.cs looks similar to this:
using Microsoft.EntityFrameworkCore;
using SmartInventoryApi.Data;
var builder = WebApplication.CreateBuilder(args);
builder.Services.AddControllers();
builder.Services.AddEndpointsApiExplorer();
builder.Services.AddSwaggerGen();
builder.Services.AddDbContext<ApplicationDbContext>(options =>
    options.UseSqlServer(builder.Configuration.GetConnectionString("DefaultConnection")));
var app = builder.Build();
if (app.Environment.IsDevelopment())
{
app.UseSwagger();
app.UseSwaggerUI();
}
app.UseHttpsRedirection();
app.UseAuthorization();
app.MapControllers();
app.Run();Step 5: Create Database Using Migrations
Run the given commands in Package Manager Console for migrations:
Add-Migration InitialCreate
Update-DatabaseThis commands creates a database SmartInventoryDb with a table Items.
You can check in your database.
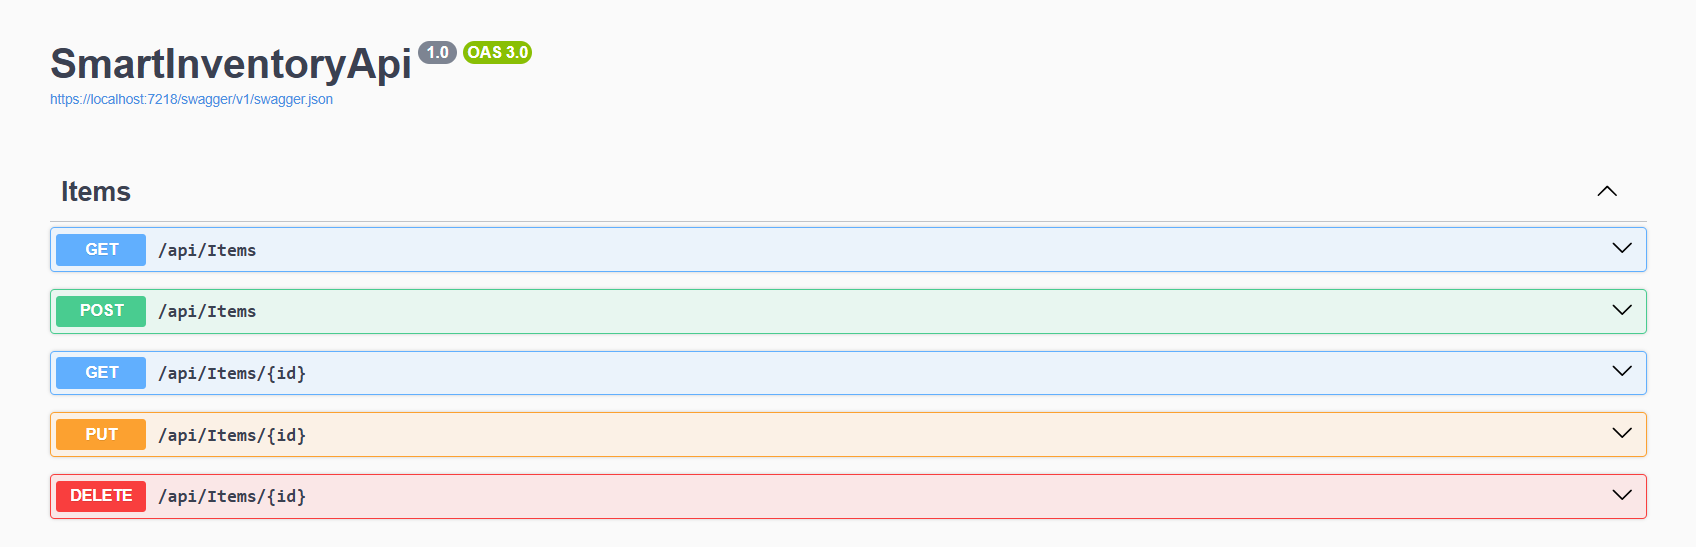
Step 6: Create ItemsController with CRUD Endpoints
1. Create a controller – ItemsController.cs in the Controllers folder:
using Microsoft.AspNetCore.Mvc;
using Microsoft.EntityFrameworkCore;
using SmartInventoryApi.Data;
using SmartInventoryApi.Models;

namespace SmartInventoryApi.Controllers
{
    [Route("api/[controller]")]
    [ApiController]
    public class ItemsController : ControllerBase
    {
        private readonly ApplicationDbContext _context;

        public ItemsController(ApplicationDbContext context)
        {
            _context = context;
        }

        // GET: api/items
        [HttpGet]
        public async Task<ActionResult<IEnumerable<Item>>> GetItems()
        {
            return await _context.Items.ToListAsync();
        }

        // GET: api/items/5
        [HttpGet("{id}")]
        public async Task<ActionResult<Item>> GetItem(int id)
        {
            var item = await _context.Items.FindAsync(id);
            if (item == null) return NotFound();

            return item;
        }

        // POST: api/items
        [HttpPost]
        public async Task<ActionResult<Item>> PostItem(Item item)
        {
            _context.Items.Add(item);
            await _context.SaveChangesAsync();

            return CreatedAtAction(nameof(GetItem), new { id = item.Id }, item);
        }

        // PUT: api/items/5
        [HttpPut("{id}")]
        public async Task<IActionResult> PutItem(int id, Item item)
        {
            if (id != item.Id) return BadRequest();

            _context.Entry(item).State = EntityState.Modified;
            await _context.SaveChangesAsync();

            return NoContent();
        }

        // DELETE: api/items/5
        [HttpDelete("{id}")]
        public async Task<IActionResult> DeleteItem(int id)
        {
            var item = await _context.Items.FindAsync(id);
            if (item == null) return NotFound();

            _context.Items.Remove(item);
            await _context.SaveChangesAsync();

            return NoContent();
        }
    }
}Step 7: Test Your Web API
- Run the project (
F5) and open Swagger UI athttps://localhost:<port>/swagger. - Test the GET, POST, PUT, DELETE endpoints.
- Now you can see the output.
- Optionally, use Postman to test API requests with JSON payloads.
Common Mistakes to Avoid
- Hardcoding connection strings
- Forgetting to use
async/awaitfor database calls - Not returning proper HTTP status codes (
404 NotFound,201 Created)
Frequently Asked Questions (FAQ)
How do I create a Web API in ASP.NET Core 8 using Visual Studio 2022?
To create a Web API in ASP.NET Core 8:
1. Open Visual Studio 2022
2. Click Create a new project
3. Select ASP.NET Core Web API
4. Choose .NET 8 as the framework
5. Enable OpenAPI (Swagger)
6. Click Create
2. How do I connect ASP.NET Core Web API to SQL Server?
You can connect your Web API to SQL Server using Entity Framework Core:
- Install
Microsoft.EntityFrameworkCore.SqlServer - Add a connection string in
appsettings.json - Register
DbContextinProgram.cs - Run migrations using
Add-MigrationandUpdate-Database
This creates your database and tables automatically.
3. How do I test ASP.NET Core Web API?
You can test your Web API using:
- Swagger UI (automatically available when OpenAPI is enabled)
- Postman for sending HTTP requests
- Browser (for simple GET requests)
Swagger is the easiest way to test endpoints during development.
4. What is CRUD in ASP.NET Core Web API?
CRUD stands for:
- Create → POST
- Read → GET
- Update → PUT
- Delete → DELETE
These are the basic operations used to manage data in a database using a Web API.
5. What should I learn after creating a basic Web API?
After building a basic Web API, you can learn:
- JWT Authentication
- Clean Architecture
- Repository Pattern
- API Versioning
- Global Exception Handling
- Caching with Redis
These topics will help you build scalable and secure APIs.
Conclusion
You have successfully created a unique ASP.NET Core 8 Web API in C# called SmartInventoryApi with full database integration.
This Web API is ready for advanced topics like:
- JWT Authentication
- Clean Architecture
- API Versioning
- Global Exception Handling
If you’re interested in becoming a complete .NET developer, read my guide: What is .NET Full Stack Development? Beginner Guide.
Related Blogs You Might Like
- Difference between .NET framework, .NET Core & .NET 8 – Learn different .NET versions.
- What is .NET Full Stack Development? Beginner Guide – Understand the full .NET full stack development.
- What Is Web API in .NET? Explained Simply (ASP.NET Core Web API) – Understand and learn web API.
- What Is ASP.NET MVC Framework? Architecture, Features, Life Cycle & Example – Learn ASP.NET MVC