
OpenAI GPT in ASP.NET Core Web API is a powerful way to add AI features to your applications. In this tutorial, I will guide you through integrating OpenAI GPT in an ASP.NET Core Web API so your app can generate smart responses, summarize text, and even act like a mini AI assistant.
I will show you step by step how to:
- Create a new ASP.NET Core Web API project
- Install and set up the OpenAI NuGet package
- Use your API key safely
- Build a GPT controller to handle requests
- Test your API using Swagger
- Follow best practices for security and performance
- Explore advanced features like chat history and document summaries
By the end, you will have a working API that can respond to AI prompts, and you’ll know how to connect it to front-end apps like Angular or Razor Pages. I’ll also point out common pitfalls and how to avoid them.
What is OpenAI GPT?
GPT stands for Generative Pre-trained Transformer. This AI model, GPT, reads and understands natural language, then creates text responses from the prompts you give it.
OpenAI offers APIs that let you:
- Ask questions and get AI answers
- Summarize articles or long documents
- Generate email drafts, reports, or code snippets
- Build chatbots for websites or applications
Some popular models include:
- gpt-4o-mini – Fast and low-cost model (recommended for most applications)
- gpt-4o – More powerful model with better reasoning
- GPT-4 – Advanced capabilities for complex tasks
Tip: Using OpenAI GPT in ASP.NET Core Web API allows your backend to provide AI-powered responses in real time, enhancing user experiences on your applications.
Why Integrate GPT with ASP.NET Core?
This is why you should integrate OpenAI GPT with ASP.NET Core:
- Enhance user experience: Build chatbots, AI assistants, or interactive FAQs.
- Automate content generation: Summarize documents, create suggestions, or draft emails.
- Learning and experimenting: Ideal for developers who want to explore how to add AI features to their apps.
- Create unique services: Few tutorials cover GPT integration in ASP.NET Core, giving your content a competitive edge.
Prerequisites
Before starting, make sure you have:
- .NET 8 SDK installed
- Visual Studio 2022 or VS Code
- OpenAI API key (sign up at OpenAI platform)
- NuGet package: OpenAI or OpenAI-DotNet
You should have a basic understanding of ASP.NET Core Web API and C# before starting.
Step 1: Create a New ASP.NET Core Web API Project
Open your terminal or command prompt and run:
dotnet new webapi -n OpenAIGPTDemo
cd OpenAIGPTDemoThis creates a clean Web API project where we can integrate OpenAI GPT in ASP.NET Core Web API. It provides default files and structure, so you don’t need to start from scratch.
Tip: You can also create the project in Visual Studio using the Web API template if you prefer a GUI. This will give you a starting point for integrating OpenAI GPT in ASP.NET Core Web API.
Step 2: Install the OpenAI NuGet Package
To use OpenAI in your project, you need to install a NuGet package.
Open your terminal and run given command.
dotnet add package OpenAIOr in Visual Studio:
- Right-click Dependencies → Manage NuGet Packages → Browse → OpenAI → Install
Tip: Installing this package adds the libraries required for your C# application to communicate with OpenAI GPT. Always check for the latest package version to access new features.
Step 3: Get Your OpenAI API Key
To use the GPT model in your ASP.NET Core app, you first need an OpenAI API key. This key lets your application securely connect to OpenAI’s services.
Follow these steps to create your API key.
1. Create an OpenAI Account
To get started, create an API key from the OpenAI Developer Platform and use it in your ASP.NET Core Web API application.
Click Sign Up and create an account using:
- Google account
- Microsoft account
- Email address
After successfully registering, access your account by logging in and then proceed to the OpenAI dashboard.
2. Open the API Keys Page
Once you are logged in:
1. Go to the API Keys section.
2. Click Create new secret key.
You will get an API key from OpenAI that looks something like this:
sk-proj-abc123xyz456....For example, a chatbot can use this API key to generate dynamic responses for customer support tickets.
Important:
The full key is shown only once, so make sure to copy and keep it safe.
3. Add Billing Information
The OpenAI API uses a pay-as-you-go pricing model.
This means you’re only charged for the amount of text (tokens) the AI processes.
For simple testing or tutorial purposes, the cost is usually very small (a few cents).
To add billing:
- Go to Billing Settings in your OpenAI dashboard.
- Add a debit or credit card.
In this tutorial, we’ll use the gpt-4o-mini model, which is fast and one of the most cost-effective options.
Tip: This key is required for OpenAI GPT in ASP.NET Core Web API to function properly. Store it securely in environment variables or User Secrets in production.
4. Copy the API Key
After the key is created, save a copy for later use. You’ll need this API key in the next step to properly configure your ASP.NET Core application.
Step 4: Configure Your OpenAI API Key
Now, go to the appsettings.json file in your project and insert the following settings:
{
  "OpenAI": {
    "ApiKey": "YOUR_OPENAI_API_KEY"
  }
}Tip: Using appsettings.json is fine for development, but for production, environment variables or Azure Key Vault are safer.
In Program.cs, register the OpenAI client:
builder.Services.AddSingleton(sp =>
{
    var config = sp.GetRequiredService<IConfiguration>();
    var apiKey = config["OpenAI:ApiKey"];

    return new OpenAIClient(new OpenAIAuthentication(apiKey));
});This registers a OpenAIClient with dependency injection, so your controller can receive it automatically. The “gpt-4o-mini” model is fast and cost-effective.
With this configuration, your app can securely access the OpenAI API key from appsettings.json.
Important Security Note
Keep your API key private—don’t share it or upload it to GitHub. Use environment variables or .NET User Secrets in production instead of storing it in appsettings.json to stay secure.
This makes the client available throughout your application.
Step 5: Create the GPT Request Model and GPT Controller for OpenAI GPT in ASP.NET Core Web API
1. Create GPTRequest Model (separate file)
First, create a new file called GPTRequest.cs inside the Models folder of your project.
This is not part of the controller — it’s a separate class that represents the data your API will receive.
Create a separate file GPTRequest.cs in the Models folder. This is not part of the controller.
namespace OpenAIGPTDemo.Models
{
    public class GPTRequest
    {
        public string Prompt { get; set; }
    }
}The Prompt property is the text you want the AI to generate a response for.
2. Create GPTController
Now create a new controller called GPTController.cs inside the Controllers folder.
This controller uses the GPTRequest model you just created.
using Microsoft.AspNetCore.Mvc;
using OpenAI;
using OpenAI.Chat;
using OpenAIGPTDemo.Models;

[ApiController]
[Route("api/[controller]")]
public class GPTController : ControllerBase
{
    private readonly OpenAIClient _client;

    public GPTController(OpenAIClient client)
    {
        _client = client;
    }

    [HttpPost("generate-text")]
    public async Task<IActionResult> GenerateText([FromBody] GPTRequest request)
    {
        if (string.IsNullOrWhiteSpace(request.Prompt))
            return BadRequest("Prompt cannot be empty.");

        try
        {
            var chatResponse = await _client.ChatCompletions.CreateCompletionAsync(
                model: "gpt-4o-mini", // Choose your model here
                messages: new[]
                {
                    new ChatMessage(ChatRole.User, request.Prompt)
                }
            );

            var result = chatResponse.Choices[0].Message.Content;

            return Ok(new { response = result });
        }
        catch (Exception ex)
        {
            return StatusCode(500, new { error = ex.Message });
        }
    }
}Tip: The GenerateText endpoint processes prompts and returns AI-generated responses. You now have a working OpenAI GPT in ASP.NET Core Web API endpoint.
Explanation:
- OpenAIClient handles communication with OpenAI GPT and sends prompts to generate AI responses.
- GenerateText endpoint accepts a prompt and returns AI-generated text.
- maxTokens controls the length of the response.
This sets up your OpenAI GPT ASP.NET Core Web API endpoint.
Step 6: Test Your OpenAI GPT in ASP.NET Core Web API Using Swagger
Run the project:
dotnet runAfter running the application using dotnet run, ASP.NET Core automatically opens the Swagger UI interface.
Swagger allows you to test your API endpoints directly from the browser without using external Tools like Postman.
Below is the Swagger interface showing the Generate Text endpoint.
In the Swagger UI, expand the POST /api/GPT/generate-text endpoint and click Try it out.
Enter a prompt inside the request body and click Execute to send the request to the API.
This demonstrates how OpenAI GPT ASP.NET Core Web API integration works in a real project.
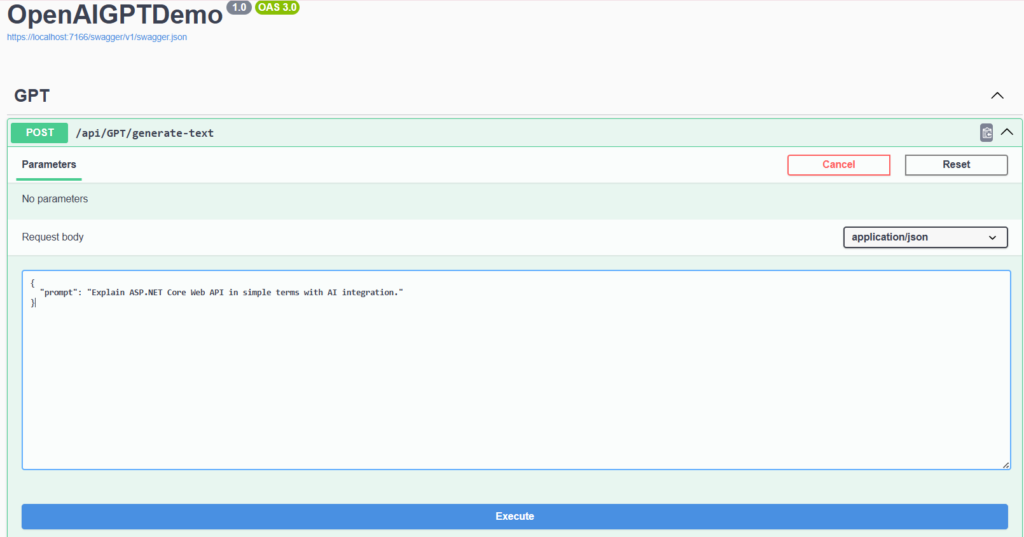
Example Request Body
When testing the API, you can provide a prompt like this:
{
  "prompt": "Explain ASP.NET Core Web API in simple terms with AI integration."
}The prompt text will be sent to the OpenAI GPT model, and the model will generate a response based on the input.
Example JSON Response
If the API key is configured correctly and the request is successful, the API will return a response similar to this:
{
  "response": "ASP.NET Core Web API is a framework in .NET that helps developers build backend services for applications. With AI integration, these APIs can do more than just send and receive data—they can process information, make predictions, or provide smart features like chatbots, recommendations, or data analysis for websites and mobile apps."
}Note:
To receive a real response from the API, you must generate an API key from the OpenAI Platform and add it to your appsettings.json configuration file.
Without an API key, the application will not be able to send requests to the OpenAI API.
The response may vary because GPT generates dynamic text based on the prompt.
Best Practices for GPT Integration
When integrating GPT into your ASP.NET Core Web API, following best practices ensures your application is efficient, secure, and maintainable:
- Use async programming – Always call GPT asynchronously to prevent blocking your API and to handle multiple requests efficiently.
- Rate limiting – OpenAI enforces token limits. Cache repeated responses to reduce unnecessary API calls.
- Security – Protect your endpoints with JWT authentication or API keys to prevent unauthorized access.
- Error handling – Handle common errors like 401 Unauthorized or 429 Too Many Requests gracefully.
- Prompt clarity – Clear and specific prompts give more accurate and useful AI responses. Avoid vague instructions.
Advanced Features
Once your basic GPT integration works, you can explore advanced capabilities:
- ChatGPT models – Use
Models.ChatGpt3_5Turbofor interactive, conversation-style responses. - Multi-turn conversation – Maintain a chat history in memory or database for building chatbots that “remember” previous messages.
- Document summarization – Pass large text or documents to GPT for summaries, reports, or highlights.
- Azure hosting – Deploy your GPT-powered Web API to Azure App Service for production use with scaling and monitoring.
These features give your application more intelligence and allow for real-world AI experiences.
Frequently Asked Questions (FAQs)
Q1: Can I use GPT in production apps?
==>
Yes, but monitor usage and costs. Secure your API keys and endpoints carefully.
Q2: How to integrate OpenAI API in .NET Core?
==>
Install the OpenAI NuGet package, configure your API key, create a Web API endpoint, and use OpenAIClient in your controller to call GPT.
Q3: How to use ChatGPT API in C#?
==>
Use OpenAIClient to call the GPT API. Set the model to ChatGpt3_5Turbo or GPT-4 for conversational responses.
Q4: Difference between ASP.NET Core MVC and Web API?
==>
MVC includes views and controllers; Web API is only backend endpoints. GPT integration is usually done in Web API because it’s a backend service.
Conclusion
Integrating OpenAI GPT ASP.NET Core Web API is simple and opens many possibilities:
- Build chatbots
- Generate summaries and reports
- Enhance user experiences with AI
Next steps: expand your API to include front-end integration, caching, logging, and cloud deployment.
By following this guide, you now have a working AI-powered Web API and a foundation for advanced AI features in your .NET applications.