
When building scalable applications using ASP.NET Core Web API, managing data access logic efficiently becomes very important. If you directly use Entity Framework Core inside controllers, your code can become tightly coupled, harder to maintain, and difficult to test.
This is where the Repository Pattern comes in.
It provides a clean way to separate data access logic from business logic, making your application more organized and maintainable.
In this guide, you’ll learn:
- What the Repository Pattern is
- How to implement it step-by-step in an ASP.NET Core Web API
- Why it is used in ASP.NET Core
If you are new to .NET, it’s helpful to first understand Difference between .NET framework, .NET Core & .NET 8 – Learn different .NET versions and explore What is .NET Full Stack Development? Beginner Guide to see how backend and frontend development fit together.
Problems Without Repository Pattern
Before understanding the pattern, let’s see the problem.
If you write database logic directly inside your controllers, it can lead to several issues:
- Your code becomes tightly coupled to the data access layer
- Unit testing becomes difficult since database logic is mixed with business logic
- You may end up repeating the same data access code across multiple controllers
Over time, this makes your application harder to maintain, harder to scale, and more prone to bugs.
If you want to see a full CRUD example using ASP.NET Core Web API, check Learn How to create ASP.NET Core 8 Web API – Step-by-Step CRUD with SQL Server & EF Core.
What is Repository Pattern?
The Repository Pattern is a design pattern that acts as a bridge between your business logic and data access logic.
Instead of writing database queries directly in your ASP.NET Core Web API controllers or services, the repository handles all data operations for you. It provides a clean and simple API to interact with your data, so your business logic doesn’t need to worry about how the data is stored or retrieved.
Think of it like a middleman that manages all communication with the database, keeping your code organized and easier to maintain.
Now we will see the real example of repository pattern.
Prerequisites / Setup
- Visual Studio 2022 or VS Code
- .NET 8 SDK
- NuGet packages: Microsoft.EntityFrameworkCore and Microsoft.EntityFrameworkCore.SqlServer
- Optional: basic knowledge of C# and ASP.NET Core
You can also explore middleware handling in requests for better control of the request pipeline in What Is Middleware in ASP.NET Core 8? Request Pipeline Explained with Custom Middleware Example.
Step-by-Step Implementation of Repository Pattern in ASP.NET Core Web API
Step 1: Create a New ASP.NET Core Web API Project
- Open Visual Studio 2022 (or VS Code).
- Click Create a new project → Select ASP.NET Core Web API → Click Next.
- Name your project: MyApi → Click Next.
- Select .NET 8 (Latest) → Make sure Use controllers is checked → Click Create.
You now have a basic Web API project ready to go.
If you need a detailed guide to creating Web APIs, check Learn How to create ASP.NET Core 8 Web API – Step-by-Step CRUD with SQL Server & EF Core.
Step 2: Add Project Folders
Organize your project for clarity:
- Models → For entity classes like
Product. - Data → For
DbContext. - Repositories → For repository interfaces and classes.
Good folder structure makes your project clean and easier to maintain.
Step 3: Install Required NuGet Packages
Install Entity Framework Core packages:
1. Right-click the project → Manage NuGet Packages.
2. Search and install:
- Microsoft.EntityFrameworkCore
- Microsoft.EntityFrameworkCore.SqlServer
- Microsoft.EntityFrameworkCore.Tools
These packages allow us to connect to SQL Server and work with EF Core.
Step 4: Create the Product Entity
Add a Product.cs file in the Models folder:
namespace MyApi.Models
{
    public class Product
    {
        public int Id { get; set; }
        public string Name { get; set; }
        public decimal Price { get; set; }
        public int Stock { get; set; }
    }
}Explanation:
This class represents our Product table. Each property becomes a column in the database.
Step 5: Create AppDbContext
Add AppDbContext.cs in the Data folder:
using Microsoft.EntityFrameworkCore;
using MyApi.Models;

namespace MyApi.Data
{
    public class AppDbContext : DbContext
    {
        public AppDbContext(DbContextOptions<AppDbContext> options) : base(options)
        {
        }

        public DbSet<Product> Products { get; set; }
    }
}Explanation:
AppDbContext is responsible for communicating with the database and mapping entities like Product.
Step 6: Create the Repository Interface
Add IProductRepository.cs in the Repositories folder:
using MyApi.Models;
using System.Collections.Generic;
using System.Threading.Tasks;

namespace MyApi.Repositories
{
    public interface IProductRepository
    {
        Task<IEnumerable<Product>> GetAllAsync();
        Task<Product> GetByIdAsync(int id);
        Task AddAsync(Product product);
        Task UpdateAsync(Product product);
        Task DeleteAsync(int id);
    }
}Explanation:
This interface defines the actions our repository can perform. Controllers will rely on this interface rather than directly using the database.
Step 7: Implement the Repository
Add ProductRepository.cs in the Repositories folder:
using Microsoft.EntityFrameworkCore;
using MyApi.Data;
using MyApi.Models;
using System.Collections.Generic;
using System.Threading.Tasks;

namespace MyApi.Repositories
{
    public class ProductRepository : IProductRepository
    {
        private readonly AppDbContext _context;

        public ProductRepository(AppDbContext context)
        {
            _context = context;
        }

        public async Task<IEnumerable<Product>> GetAllAsync()
        {
            return await _context.Products.ToListAsync();
        }

        public async Task<Product> GetByIdAsync(int id)
        {
            return await _context.Products.AsNoTracking().
            SingleOrDefaultAsync(p => p.Id ==   id);
         }

        public async Task AddAsync(Product product)
        {
            _context.Products.Add(product);
            await _context.SaveChangesAsync();
        }

        public async Task UpdateAsync(Product product)
        {
            _context.Products.Update(product);
            await _context.SaveChangesAsync();
        }

        public async Task DeleteAsync(int id)
        {
            var product = await _context.Products.FindAsync(id);
            if (product != null)
            {
                _context.Products.Remove(product);
                await _context.SaveChangesAsync();
            }
        }
    }
}Explanation:
This class contains all the database logic. Now your controllers don’t need to touch the database directly.
Step 8: Configure Dependency Injection
Open Program.cs and update it as follows:
using Microsoft.EntityFrameworkCore;
using MyApi.Data;
using MyApi.Repositories;

var builder = WebApplication.CreateBuilder(args);

// Add services to the container
builder.Services.AddControllers();

// Configure DbContext
builder.Services.AddDbContext<AppDbContext>(options =>
    options.UseSqlServer(builder.Configuration.GetConnectionString("DefaultConnection")));

// Register repository
builder.Services.AddScoped<IProductRepository, ProductRepository>();

// Add Swagger services
builder.Services.AddEndpointsApiExplorer();
builder.Services.AddSwaggerGen();

var app = builder.Build();

// Enable Swagger UI in Development
if (app.Environment.IsDevelopment())
{
    app.UseSwagger();
    app.UseSwaggerUI();
}

app.UseHttpsRedirection();
app.UseAuthorization();

app.MapControllers();

app.Run();If you want to understand Dependency Injection more deeply, see Dependency Injection in ASP.NET Core: Explained with Real Examples (2026 Guide).
Explanation:
- AddDbContext → Registers the database context so it can be used across the application.
- AddScoped → Registers the repository so it can be injected into controllers.
- AddEndpointsApiExplorer and AddSwaggerGen → Registers Swagger services for API documentation.
- UseSwagger and UseSwaggerUI → Enables the Swagger UI so you can test your API endpoints in the browser.
Step 9: Database Setup
1. Add a Connection String
Open appsettings.json and add the following inside the file:
{
  "ConnectionStrings": {
    "DefaultConnection": "Server=(localdb)\\MSSQLLocalDB;Database=MyApiDb;Trusted_Connection=True;MultipleActiveResultSets=true"
  }
}Explanation:
- Server=(localdb)\MSSQLLocalDB → Uses the built-in LocalDB in Visual Studio for development.
- Database=MyApiDb → Name of your database (EF Core will create it automatically).
- Trusted_Connection=True → Uses Windows authentication.
- MultipleActiveResultSets=true → Allows EF Core to run multiple queries at the same time.
2. Create the Database Using EF Core Migrations
1. Open Package Manager Console in Visual Studio (Tools → NuGet Package Manager → Package Manager Console).
2. Run the following commands:
Add-Migration InitialCreate
Update-DatabaseExplanation:
- Add-Migration InitialCreate → Tells EF Core to create a migration file based on your DbContext and entity classes.
- Update-Database → Applies the migration and creates the database (MyApiDb) with the Products table.
After this table automaticaly created in database.
Step 10: Create Products Controller
Create a new file ProductsController.cs in the Controllers folder:
using Microsoft.AspNetCore.Mvc;
using MyApi.Models;
using MyApi.Repositories;
using System.Collections.Generic;
using System.Threading.Tasks;

namespace MyApi.Controllers
{
    [ApiController]
    [Route("api/[controller]")]
    public class ProductsController : ControllerBase
    {
        private readonly IProductRepository _repository;

        public ProductsController(IProductRepository repository)
        {
            _repository = repository;
        }

        [HttpGet]
        public async Task<IEnumerable<Product>> GetAll() => await _repository.GetAllAsync();

        [HttpGet("{id}")]
        public async Task<ActionResult<Product>> GetById(int id)
        {
            var product = await _repository.GetByIdAsync(id);
            if (product == null) return NotFound();
            return product;
        }

        [HttpPost]
        public async Task<ActionResult> Create(Product product)
        {
            await _repository.AddAsync(product);
            return CreatedAtAction(nameof(GetById), new { id = product.Id }, product);
        }

        [HttpPut("{id}")]
        public async Task<ActionResult> Update(int id, Product product)
        {
            if (id != product.Id) return BadRequest();
            await _repository.UpdateAsync(product);
            return NoContent();
        }

        [HttpDelete("{id}")]
        public async Task<ActionResult> Delete(int id)
        {
            await _repository.DeleteAsync(id);
            return NoContent();
        }
    }
}In real applications, you should also secure your APIs using How to Implement JWT Authentication In ASP.NET Core 8 Web API (Step-by-Step).
Explanation:
- The controller handles HTTP requests and uses the repository for data access.
- There’s no direct database code in the controller.
- Endpoints include: GET all, GET by id, POST, PUT, and DELETE.
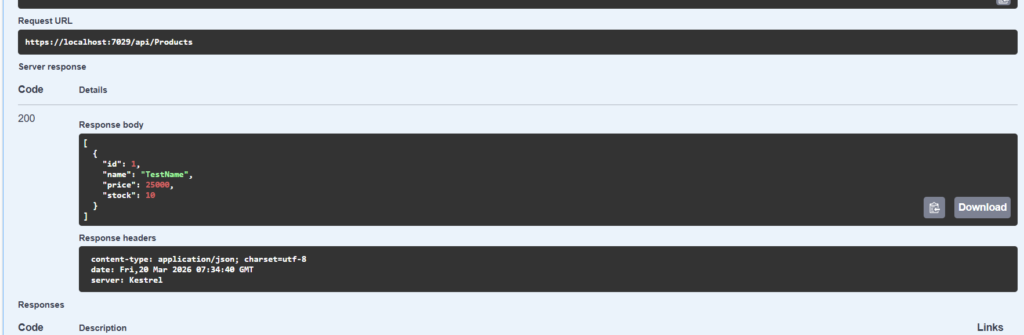
Step 11: Test Your API
1. Run the project (F5 or Ctrl + F5).
2. Open your browser and navigate to:
https://localhost:{port}/swagger3. You will see all your API endpoints listed in Swagger UI automatically.
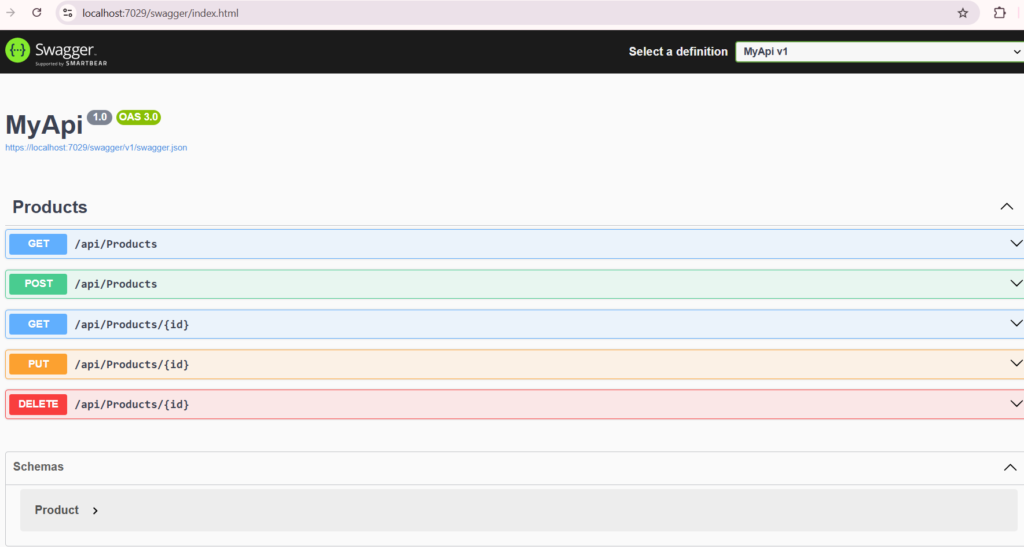
4. Test each endpoint directly in Swagger UI:
GET→ List all products
You can test also given endpoints.
POST→ Add a productPUT→ Update a productDELETE→ Delete a product
5. Everything now works, and your API uses the Repository Pattern with clean, maintainable code.
Why Use Repository Pattern in ASP.NET Core
Now that we’ve implemented the Repository Pattern, it’s easier to see why it’s so useful.
1. Keeps your code clean and organized
Without a repository, database queries are mixed into controllers, making them messy. Using a repository keeps all data access logic in one place, so controllers only focus on handling HTTP requests.
2. Makes testing much easier
Since the repository is separate from controllers, you can mock it in unit tests. This way, you can test your business logic without touching the database.
3. Reduces duplicated code
Often, multiple controllers need the same database logic. The repository allows you to reuse the same methods, so you don’t have to write the same code again and again.
4. Flexible for future changes
If you change your database or how data is stored, you only need to update the repository. Your controllers and business logic don’t need to change.
5. Better for large projects and teams
In bigger applications, separating data access makes it easier for multiple developers to work together without creating messy, hard-to-maintain code.
In short:
The Repository Pattern acts like a middleman between your controllers and the database. It keeps your code clean, testable, reusable, and easy to maintain, which is exactly what you need in a scalable ASP.NET Core Web API.
Conclusion
The Repository Pattern is a practical approach for writing clean, organized, and maintainable code in ASP.NET Core Web API applications. Instead of placing database logic directly inside controllers, it helps separate concerns and keeps your code structure clear.
By using this pattern, your application becomes easier to understand, test, and maintain over time.
If you are building real-world projects, following the Repository Pattern can help reduce complexity and improve scalability as your application grows.
Start with small projects, practice the concept, and gradually apply it in larger applications. Over time, you will notice a significant improvement in your code quality and overall architecture.
Frequently Asked Questions (FAQ)
1. What is the Repository Pattern in ASP.NET Core?
It is a way to separate database code from the rest of your application. It works like a middle layer between your app and the database.
2. Why should I use the Repository Pattern?
It helps keep your code clean and organized. It also makes your application easier to test and maintain.
3. Do I need to use it in every project?
No. For small projects, you can skip it. But for bigger projects, it is very useful.
4. Does Entity Framework Core already work like a repository?
Yes, it does. But creating your own repository gives you better control and structure.
5. What is the difference between Repository and DbContext?
DbContext directly talks to the database.
Repository is a cleaner way to manage and organize that database access.
6. Can I use Repository Pattern with Unit of Work?
Yes. They are often used together to handle multiple database operations in a better way.
7. Does Repository Pattern improve performance?
Not directly. But it improves code quality, which helps your project grow and stay manageable.
Related Articles
- Difference between .NET Framework, .NET Core & .NET 8
- What is .NET Full Stack Development? Beginner Guide – Understand the full .NET full stack development.
- What Is ASP.NET MVC Framework? Architecture, Features, Life Cycle & Example – Learn ASP.NET MVC
- What Is Web API in .NET? Explained Simply
- Learn How to Create ASP.NET Core 8 Web API (CRUD Guide)
- How to Implement JWT Authentication in ASP.NET Core 8
- How to Implement Caching in ASP.NET Core 8 Web API (Types & Examples)
- What Is Middleware in ASP.NET Core 8? Request Pipeline Explained with Custom Middleware Example
- Azure for .NET Developers: Beginner Guide
- How to Optimize ASP.NET Core 8 Web API Performance
- Dependency Injection in .NET Core